Guides › Getting started
Installation and first setup
How to install Nanoq Intranet on a WordPress site and get the intranet ready for the first employees – step by step.
Before you start
Nanoq Intranet is a WordPress plugin. It turns an ordinary WordPress site into a closed intranet that employees log in to.
- WordPress 6.0 or newer. Nanoq is tested on WordPress 7.1.
- PHP 8 is recommended.
- HTTPS (an SSL certificate) on the site – employees log in with a password.
- Email that can be sent from the site. An SMTP plugin is a good idea, so notifications don’t end up in spam.
- An administrator account in WordPress.
Take a backup of the site before you install or update plugins.
The intranet can live on a site used only for the intranet, or next to an ordinary website. That decides whether you should turn on Lock The Site (see step 4).
1. Install the plugin and activate the licence
- Log in to WordPress as an administrator.
- Go to Plugins → Add New Plugin → Upload Plugin.
- Choose the zip file with Nanoq Intranet and click Install Now.
- Click Activate Plugin.
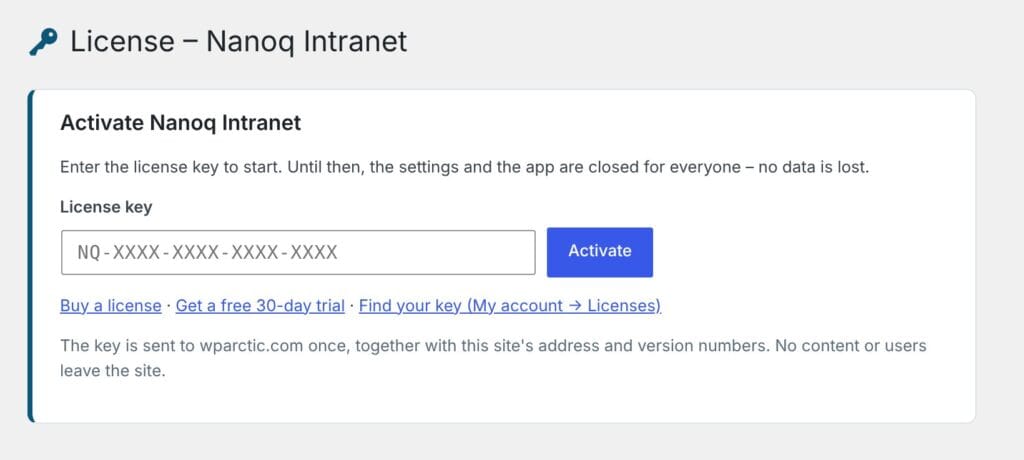
- Go to Nanoq → License, paste the licence key (
NQ-…) and click Activate.
Until the licence is activated, the menu only shows Nanoq with the licence page, and the intranet is closed for everyone – no data is lost. The licence key is in the order email and under My account → Licenses on wparctic.com. If you want to try it first, you can get a free 30-day trial via the link on the licence page.
The key is sent to wparctic.com once, together with the site’s address and version numbers. No content and no users leave the site.
After activation, WordPress has a number of new menu items: Nanoq (the settings), Nanoq Groups, Nanoq News, Nanoq Files and more. The plugin creates the database tables it needs by itself.
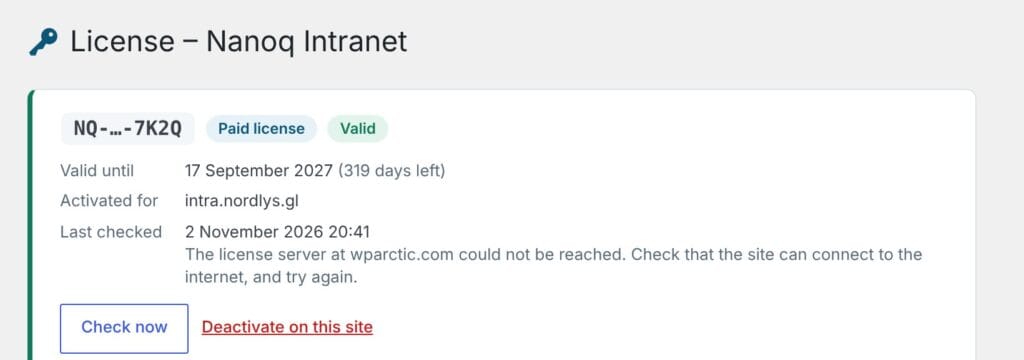
Under Nanoq → License you see the site, the key, whether it is a paid or a trial licence, and how long it is valid. Check now fetches the status from wparctic.com, and Deactivate on this site releases the licence so it can be activated at another address – for example when the intranet moves. A licence covers one site; a copy (for example a test site) gets a notice but keeps working.
2. Open the settings
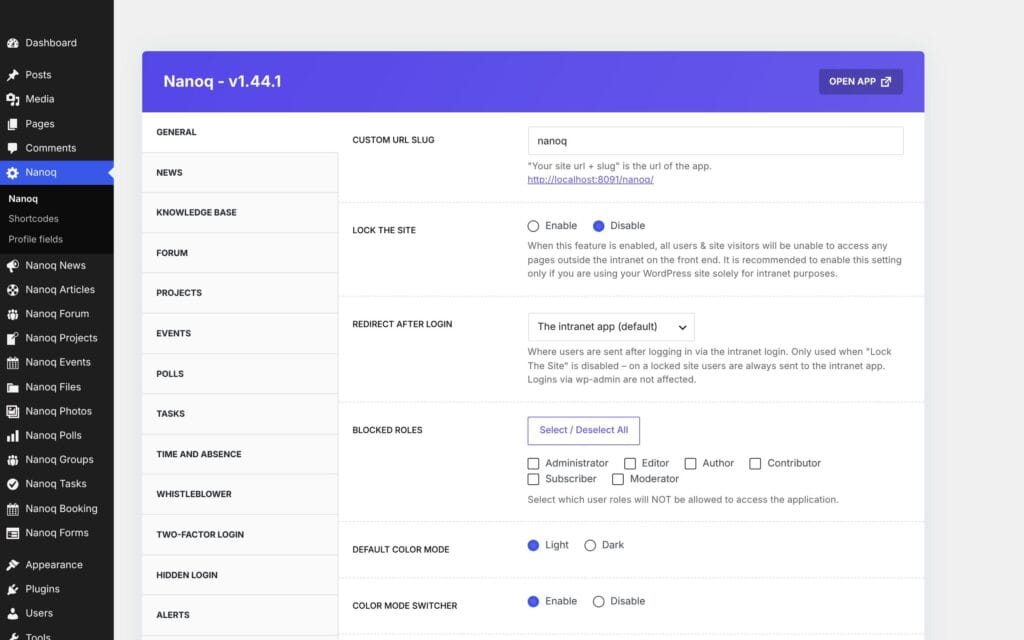
The settings are under Nanoq in the WordPress menu. At the top you’ll find the version number and the OPEN APP link, which opens the intranet itself in a new tab.
The settings are split into tabs: General and one tab per module (News, Knowledge Base, Forum, Projects, Events, Polls, Users, Messages, Files, Photos, Tasks, Time and absence, Whistleblower, Two-factor login, Hidden login and more). Remember to save at the bottom when you have changed something.
3. Choose the intranet’s address
Under General → Custom URL Slug you decide where the intranet lives. The default is nanoq, so the intranet is found at https://your-site.com/nanoq/.
Choose a short word without spaces or special characters, such as intra or portal. If you change the address later, old bookmarks will stop working.
4. Lock the site – or don’t
General → Lock The Site decides whether the rest of the WordPress site can be seen:
- Enable if the site is used only for the intranet. All visitors are sent to the intranet login, and no ordinary pages are visible.
- Disable if the site is also your public website, or if you want to show intranet content on ordinary pages with shortcodes.
Under Redirect After Login you choose where employees land after logging in: in the app (default), on the front page or on a specific page. If the site is locked, everyone lands in the app.
If you have Uppik CRM on the same site, Uppik’s own pages – e.g. the customer portal and public links – can still be reached even when the site is locked (from version 1.66.8).
5. Design, logo and colours
Under General you choose:
- Design: Arctic (default) or Classic.
- Logo for light and dark mode, Primary Color and optionally an image for the welcome banner.
- Default Color Mode (light/dark), and whether employees may switch themselves.
6. Turn on the modules
Each tab has a switch at the top that turns the module on or off. Modules that are turned off disappear from the menu and are not loaded at all.
It’s a good idea to start with a few modules – such as News, People, Messages and File library – and turn on more once employees are up and running. Whistleblower, Two-factor login and Hidden login are off until you turn them on.
7. Create employees and roles
Employees are ordinary WordPress users. Create them under Users → Add New User and choose a role. Nanoq uses the WordPress roles:
| Role | Typical use |
|---|---|
| Administrator | IT and management. Can do everything, including the settings. |
| Editor | Communications and department managers. Can write news and manage categories, albums and other people’s content. |
| Author | Employees who may create content (news, projects, events). |
| Subscriber | Ordinary employees who read, take part and comment. |
What each role may do is controlled per module with the fields Restrict Access (who may see the module) and, for example, Add Post or File Upload (who may create). Under General → Blocked Roles you choose roles that may not use the intranet at all.
Employees fill in their own phone, job title and profile picture under Settings in the app. See People.
8. Create departments as groups
Groups are used for departments, teams and committees. They control who sees what, and who approves holidays.
- Go to Nanoq Groups → Add new group.
- Give the group a name, a description and a colour.
- Add members and appoint one or more leaders.
Read more in Groups and access.
9. Notifications, push and email
Everything that happens is shown under the bell at the top of the menu. Under General you also choose:
- Email Notifications – whether emails may be sent about new messages, tasks, holiday requests and the like.
- Pop-up notifications – a small box in the corner while you are on the intranet.
- Push notifications and app – notifications on phone and computer when the intranet is closed. Requires https.
- New users get – the channels new employees start with.
Each employee chooses for themselves under Settings → Notifications in the app. Read more in Notifications, push and app.
Install an SMTP plugin and send a test email before you get started. Otherwise notifications may end up in spam.
10. Protect the files
Files and photos are stored in a protected folder, so they can only be downloaded by employees who are logged in and have access.
- If the site has files from before the protection, they are moved under Nanoq Files → File protection. Take a backup first.
- If the server runs Nginx, the folder must also be blocked in the server configuration. The rule is shown on the File protection page. On Apache and LiteSpeed this happens automatically.
11. Security
- Turn on Two-factor login – at least for administrators.
- Move the WordPress login to a secret address with Hidden login.
- Use strong passwords and keep WordPress and plugins up to date.
12. Scheduled tasks (WP-Cron)
Reminders, automatic clock-out, clean-up and the search index run on WordPress’ built-in scheduler. It only starts when someone visits the site. On sites with little traffic, a real cron job on the server that calls wp-cron.php every 5–15 minutes is recommended.
13. Language
By default Nanoq follows the WordPress language. Choose English (UK) or English (United States) under Settings → General → Site Language in WordPress, so dates and months are shown in English. Danish and Greenlandic are included too.
If the intranet should be in Greenlandic, choose Kalaallisut under Nanoq → General → Language. Each employee can also choose their own language. See Languages and Greenlandic.
Updating to a new version
From version 1.31, Nanoq Intranet updates itself from wparctic.com – just like plugins from wordpress.org:
- When there is a new version, it shows up under Plugins and Dashboard → Updates in WordPress. Click View details to see what’s new, and Update now to update.
- If you want it to happen by itself, click Enable auto-updates next to Nanoq Intranet under Plugins.
- Updates require an active licence. If a paid licence expires, Nanoq keeps working, but without updates and support until the licence is renewed. A trial licence locks the plugin when the 30 days are up – all data is kept, and everything opens again when a licence is activated.
- It’s a good idea to take a backup first. Settings and content are kept, and new modules are off until you turn them on.
If you run version 1.30.3 or older, you need to update by hand once: go to Plugins → Add New Plugin → Upload Plugin, choose the new zip file and choose Replace current with uploaded. After that, updates arrive by themselves.
From version 1.46, Nanoq needs a licence. If you update from an older version, everything works as before for 30 days – activate the licence under Nanoq → License before then.
See what’s new in the Changelog.
Try it with demo data
If you want to see a finished intranet before you add your own content, the companion plugin Nanoq Demo Data can fill the site with a fictional company: 14 employees, departments, news, files, tasks, shifts and much more. It is found under Tools → Nanoq demo data, and the Remove button deletes exactly what was imported. There is an English edition of the demo data too.
Use demo data on a test site – not on your real intranet.
Checklist
- The plugin is activated, the licence is activated under Nanoq → License, and OPEN APP works.
- The address is chosen, and Lock The Site is set correctly.
- Logo, colours and design are chosen.
- The modules you want are turned on, and the roles are restricted.
- Employees are created with the right roles.
- Departments are created as groups with leaders.
- Email works, and notifications and push are set up.
- File protection and security are in place.